1 April 1st (Starting at the begging) At the time of this writing April 1st is coincidentally the same day as tomorrow, which can only mean one thing: APRIL FOOLS DAY! And I love my April fools day. I am just foaming at the mouth with all of tomorrows opportunities. I won't go into great detail with all of my next-to-pure-evil schemes but I would be more than happy to help you with yours if you care to facebook message me.
2 Spring break! After tomorrow at 3:30 I will have 10 days of Delicious FREEDOM. That's right, and there is nothing you teachers are gonna do about it. This just makes me want to run around my house like there is a million dollars in my pocket.
3 In April we will be totally refreshed. I have a good feeling that everyone (My self included) will feel a lot nicer and more tolerant after spring break. Yeah it will be like that one clever commercial with the guy with the empty battery screen.
By the way what are the Ides or March? I looked it up and didn't help me much.
Looks like it's time for todays Technical Tip: Fun with Pictures


Looks like it's time for todays Technical Tip: Fun with Pictures
I love pictures they are just awesome. I like taking them, drawing them, editing them, messing with them, and most importantly tricking them out, so for the reader of mine who enjoys fun little cool projects welcome to my first little how to.
Step 1: your gonna need something good for this. Maybe you have noticed some people have taken some pictures and made put themselves in different places, or done something physically impossible in a picture. Like this
I made this one a while ago using my very favorite editor paint.net. (Not to be confused with tragically boring ugly o'l ms paint that comes pre-installed on any windows) Paint.net is one little cool program I'd recommend to anyone, along with gimp or any other decent free-ware image editor. I prefer paint.net for it's ease of use and flexibility. I'm not rolling in the benjamins right now so I can't really say I am a Photoshop guru. I also can't say I'd like to lay down like 500 bucks to get an adobe product package. But I can still be awesome with this stuffs and their is nothing wrong with that.
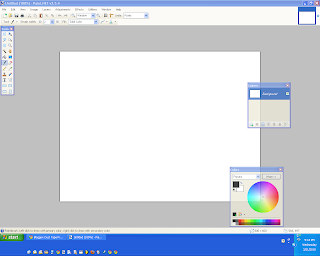
Step2: A project. Let's try making something simple putting ourselves somewhere else. This will look great on facebook. To start you'll need the aforementioned image editor (You can download paint.net (virus free) here  Paint.net does have a few requirements so make sure you have those if your going to download) So let's begin by opening it.
Paint.net does have a few requirements so make sure you have those if your going to download) So let's begin by opening it.
Cool huh?
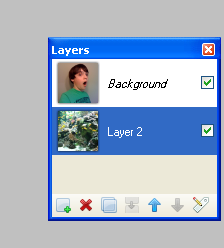
step 3: Get your images. Press open and get a picture of yourself from your files. (preferably next to a blank wall) Next get another image from the internet where you would like to be. (A fish tank will do nicely I am thinking bigger though http://commons.wikimedia.org/wiki/File:Aquarium_tropical_-_bac_marin.JPG) Copy the image from the internet, where ever you find one. Press the new layer button on the layer window.(It's the one with a green plus sign) Once you have the new layer paste your fish tank in on this layer. Make sure that you don't expand the image if the picture is too big. Just move it around. It should look like something like this:
 Once you have the new layer paste your fish tank in on this layer. Make sure that you don't expand the image if the picture is too big. Just move it around. It should look like something like this:

Step 4: Shaving. Once you have your pictures. Go to your top layer. It's time to delete your background (hopefully a wall if you were smart enough to take my advice) Your gonna want to grab the magic wand tool from the side bar. Select an area of the background and delete it by pressing the delete key. If you select part of your skin you've gone too far adjust the tolerance level at the top of your screen to a lower level. Keep doing this until you have deleted the background. While you are doing this you can see that new background behind you. (Note: If you find this process going too slow try adjusting the tolerance to a higher level.) It should look something kinda like this:

Once you finish getting what you can our of the the background you can go through the rest of the debris with the eraser tool.

Now that is awesome. But We're not quite done yet.
Step 6: Finishing touches. Now that I'm done with the shopping out background I have some options. I could edit my appearance, or change my background. Let's do both. First I'll change my size. I want it to look like I'm really in this ocean aquarium. First I selected my self with the box selection tool and then sized it down with the dark blue pointer.

Wow. I'm in the aquarium. But that's not good enough. I'd rather be in a different place so I changed it. I saved my file back when I was bigger so I could change it to another place.

Waterfall!!!!!!!!
Well that completes my little how-to. Hope it was helpful. Keep coming back for more awesome stuffs.
Have any questions? Facebook me about it.
No comments:
Post a Comment